Hello, party people.
This is a blog post explaining how to connect to the University of
Chicago VPN using Network Manager and openconnect from an Arch
Linux machine with no desktop environment
installed.
Prerequisites
This post assumes an “I run Linux on my computer” level of tech-savviness. If you don’t know what any of those words mean, or if this post employs concepts that you don’t understand but would like to, please feel free to get in touch with me and I’ll be happy to write a follow-up post explaining whatever you’d like to know about.
Background
For the past six years, I have been using netctl to connect to wifi
on several of my Linux laptops. netctl performs pretty flawlessly
if you can figure out how to configure it; you set a connection
profile up, and if it successfully connects once, then the moment you
bring your laptop within range of that wifi router again in the
future, it will automatically remember your credentials and reconnect.
However, despite my overall enthusiasm for netctl’s simplicity and
reliability, I recently decided to switch to using Network Manager, a
software package that originated from the Red Hat and GNOME projects.
Network Manager is more complicated and feature-heavy than netctl,
but in general it aspires to similar functionality.
One reason I decided to switch is that Network Manager is available on
more platforms than netctl, which makes it easier for me to
standardize my configuration across different machines with different
flavors of Linux installed. Another reason for the switch is that as
far as I know, netctl does not have the ability to connect to the
UChicago
VPN,
The VPN is a useful service that I have access to for free as an
employee of the University of Chicago, and it is also the officially
recommended means of connecting to our internal networks when we are
working remotely. Given that it is a Cisco AnyConnect VPN, the
UChicago VPN is particular about how it handles single sign-on and
two-factor authentication, and this has historically made Linux
support for it rather limited. However, the open-source VPN client
openconnect has recently made strides in its support for Cisco
AnyConnect VPNs, allowing it to do SSO and 2FA in exactly the way they
expect, and which can be incorporated close to idiomatically into a
Linux workflow.
Like netctl, Network Manager provides a high-level interface that is
capable of generating a configuration for a simple home wifi network
using WPA2-PSK authentication. This allows you to essentially just
type in the SSID and password of the network you’d like to connect to,
whereupon netctl will generate a full configuration file and install
it to your /etc directory. You won’t ever have to worry about
setting that network up again unless the router, password, SSID,
etc. change.
Also as with netctl, if you are using Network Manager to connect to
a WPA2-Enterprise network that uses 802.1x authentication, you are on
your own. You’ll have to write your own configuration file manually
and there may or may not be documentation available to help you do it.
In this post, I will only cover authenticating to the VPN from a
simple home wifi network, because I personally lack any compelling
reason to be connected to the UChicago VPN when I am physically on
campus.
Install the necessary software
As stated above, these instructions assume that you are connecting from a machine that uses Arch Linux and has no desktop environment installed. The first thing you should do is install the following big pile of software packages:
$ sudo pacman -S networkmanager networkmanager-openconnect network-manager-applet gcr webkit2gtk-4.1 libnma libnma-gtk4
There are a lot here, they’re hard to remember, and if you’re missing any of them when it comes time to connect to the VPN later on, Network Manager is likely to error out with no explanation in its error messages or in the system logs. Here’s a high-level explanation to help you remember which packages you need to have installed:
networkmanager, the main software packagenetworkmanager-openconnect, a plugin for helping Network Manager connect specifically to Cisco VPNsnetwork-manager-applet, the helper program that is going to launch a GUI interface with a web browser inside it to help with SSO and 2FA- all of
network-manager-openconnect’s optional dependencies, which are in fact not optional if you have no desktop environment installed on your computer
Forgetting that last bullet point is a common mistake when trying to
set this up for the first time. gcr, webkit2gtk-4.11, libnma,
and libnma-gtk4 are required to get nm-applet to launch the GUI
window that will allow you to authenticate to the VPN via a web
browser. They are only listed as optional dependencies in pacman
because if you already have the full GNOME desktop environment
installed, it comes with those utilities and libraries. However, I do
not run GNOME on any of my machines, so I definitely need them.
If you want to look up what these optional dependencies are, you can
use pacman:
$ pacman -Qi networkmanager-openconnect
Name            : networkmanager-openconnect
Version         : 1.2.10-3
Description     : NetworkManager VPN plugin for OpenConnect
Architecture    : x86_64
URL             : https://networkmanager.dev/docs/vpn/
Licenses        : GPL-2.0-or-later
Groups          : None
Provides        : None
Depends On      : gcc-libs  glib2  glibc  libnm  libsecret  libxml2  openconnect  libopenconnect.so=5-64
Optional Deps   : gcr: GUI support [installed]
                  libnma-gtk4: GUI support (GTK 4) [installed]
                  libnma: GUI support (GTK 3) [installed]
                  webkit2gtk-4.1: GUI support [installed]
Required By     : None
Optional For    : None
Conflicts With  : None
Replaces        : None
Installed Size  : 3.07 MiB
Packager        : Jan Alexander Steffens (heftig) <heftig@archlinux.org>
Build Date      : Wed 23 Apr 2025 09:55:15 PM CDT
Install Date    : Wed 18 Jun 2025 08:43:23 PM CDT
Install Reason  : Explicitly installed
Install Script  : No
Validated By    : Signature
Set your machine up to connect to your home wifi
Before setting the VPN up, you’ll want to connect to your home wifi.
“Connection profile” is Network Manager’s term for “wifi router that I
routinely connect to”. So you will have a configuration file
corresponding to a connection profile for each wifi network that you
want your computer to remember as you carry your laptop from place to
place. These files are given names of your choice and end in the
.nmconnection extension.
You can either use a GUI tool called nm-connection-editor to
generate these *.nmconnection files, or you can manually write them.
Network Manager also provides a TUI tool for generating connection
profiles called nmtui, which I will not cover here, because its
functionality is rather limited. In what follows, I’ll show you two
different ways you can create a connection profile for getting onto
your home wifi, first using the GUI tool nm-connection-editor, and
next by manually creating the file.
Generate your home wifi connection profile using nm-connection-editor
To get started creating your home wifi connection profile, run
nm-connection-editor:
$ nm-connection-editor &
You will see a GUI application pop up. Hit the “+” button in the bottom left hand corner of the window. You should then see a window saying “Choose a Connection Type” pop up, featuring a dropdown menu. Select “WiFi” from the dropdown, then hit “Create…” That should take you to a window that looks like this:
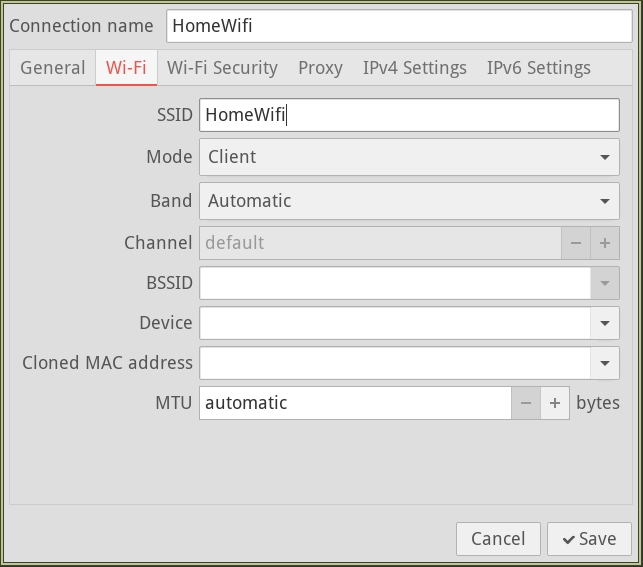
Type whatever name you want to give this connection under “Connection
Name”. Fill in the name of your wifi router’s SSID under “SSID”. In
this example, I will use HomeWifi for both. Then click the “Wi-Fi
Security” tab. Now select “WPA/WPA2/WPA3 Personal” from the dropdown
called “Security”. You should see a text field for entering your
password that looks like this:
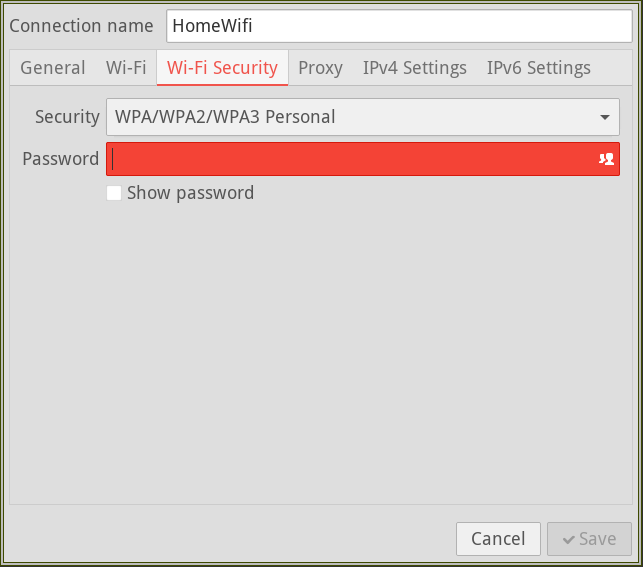
Type your password in that field, then hit “Save”. Hitting the “Save”
button will write a file called HomeWifi.nmconnection to
/etc/NetworkManager/system-connections.
Alternatively: write your home wifi connection profile manually
To create your home wifi connection profile manually, you will need to create a configuration file which:
- is located at
/etc/NetworkManager/system-connections - has
600permissions - is named
HomeWifi.nmconnection, whereHomeWifiis whatever name you want to give your home wifi network
The contents of the file should more or less be this, except that you need to fill in a new UUID for the profile, your SSID, and your wifi password:
[connection]
id=HomeWifi
uuid=INSERT UUID HERE
type=wifi

[wifi]
mode=infrastructure
ssid=INSERT SSID HERE

[wifi-security]
auth-alg=open
key-mgmt=wpa-psk
psk=INSERT YOUR WIFI PASSWORD HERE

[ipv4]
method=auto

[ipv6]
addr-gen-mode=default
method=auto

[proxy]
Network Manager likes to use UUIDs as identifiers for the different
entities its configuration recognizes. To generate one, you’ll need
uuidgen from the util-linux package:
$ sudo pacman -S util-linux
Run the uuidgen command to generate a fresh UUID, which you can
paste into the above HomeWifi.nmconnection file:
$ uuidgen
aacdb84a-d03b-4159-a47d-7f9d34b9b3b5
HomeWifi.nmconnection is the only configuration file you’ll need for
this initial step.
Connect to your home network
To go ahead and connect to your home wifi, start and enable Network
Manager using systemd:
$ sudo systemctl start NetworkManager
$ sudo systemctl enable NetworkManager
You should now be able to use nmcli to see whether the connection
worked. It might not look exactly like this on your
machine–particularly the device name for HomeWifi–but it should
look approximately like this:
$ nmcli connection show
NAME                UUID                                  TYPE      DEVICE
HomeWifi            aacdb84a-d03b-4159-a47d-7f9d34b9b3b5  wifi      wlp0s20f3
lo                  1b3b25ac-7950-437d-8cdd-e6493f3f6d3b  loopback  lo
Wired connection 1  57b64325-ea3a-3114-890c-625bafda9a7e  ethernet  --
Although the above text block isn’t displaying anything in green
because of how my static site generator syntax highlights console
code, in your terminal on your computer, any successful connection in
that list should appear in green. If HomeWifi and lo are in
green, you should be good to go. A ping will confirm that you’re
connected to the internet:
$ ping gnu.org
PING gnu.org (2001:470:142:5::116) 56 data bytes
64 bytes from wildebeest1p.gnu.org (2001:470:142:5::116): icmp_seq=1 ttl=52 time=39.7 ms
64 bytes from wildebeest1p.gnu.org (2001:470:142:5::116): icmp_seq=2 ttl=52 time=42.5 ms
^C
If you aren’t connected, there could be a typo in your
HomeWifi.nmconnection file. If you find one and fix it, you should
be able to attempt to reconnect with this command:
$ nmcli connection up HomeWifi
Another way to reload your config is to restart Network Manager itself:
$ sudo systemctl restart NetworkManager
If you suspect your configuration file has a syntax error, you can
check to see whether it meets the basic syntactic requirements for a
Network Manager profile by checking to see whether it is in the list
of profiles that appear when you run nmcli connection show. If it
is not on that list, your configuration file is syntactically
ill-formed. If it appears there but you can’t connect, then it’s
worth double checking to make sure that your file matches the above,
content-wise, that there isn’t a typo in your SSID, etc.
Once you are successfully connected, you don’t need to do anything further to have Network Manager automatically remember and connect to this wifi router. Once you’re connected to your home wifi, you can start in on setting up a second profile to connect to the VPN.
Set up the VPN
I’m about to tell you to create another connection profile. Why create a second connection profile? The reason is that this is the way Network Manager distinguishes between:
- when you connect to the internet normally
- when you connect to the VPN
When you first connect to your wifi and run nmcli connection show,
the profile for your home wifi network will appear in green. Once you
your VPN is set up, you will connect to only your home internet
profile when you want to merely be on the internet, and you will
connect to both your home profile and your VPN profile when you want
to be on the VPN via your home router. You can also configure things
so that every time you connect to your home router, Network Manager
automatically also connects to the VPN. I chose not to set my machine
up that way, because I typically only want to be connected to the VPN
when I am working remotely.
Similarly to how we did it above, I will first show you how to
generate your VPN profile using nm-connection-editor, then show you
how to write it manually.
Generate your VPN connection profile using nm-connection-editor
From within an X session, run nm-connection-editor:
$ nm-connection-editor &
You will see a GUI application pop up. Hit the “+” button in the bottom left hand corner of the window. You should then see a window saying “Choose a Connection Type” pop up, featuring a dropdown menu, from which you should select “Cisco AnyConnect or OpenConnect (OpenConnect)“. Then hit the “Create…” button. You should then see a window that looks approximately like this:
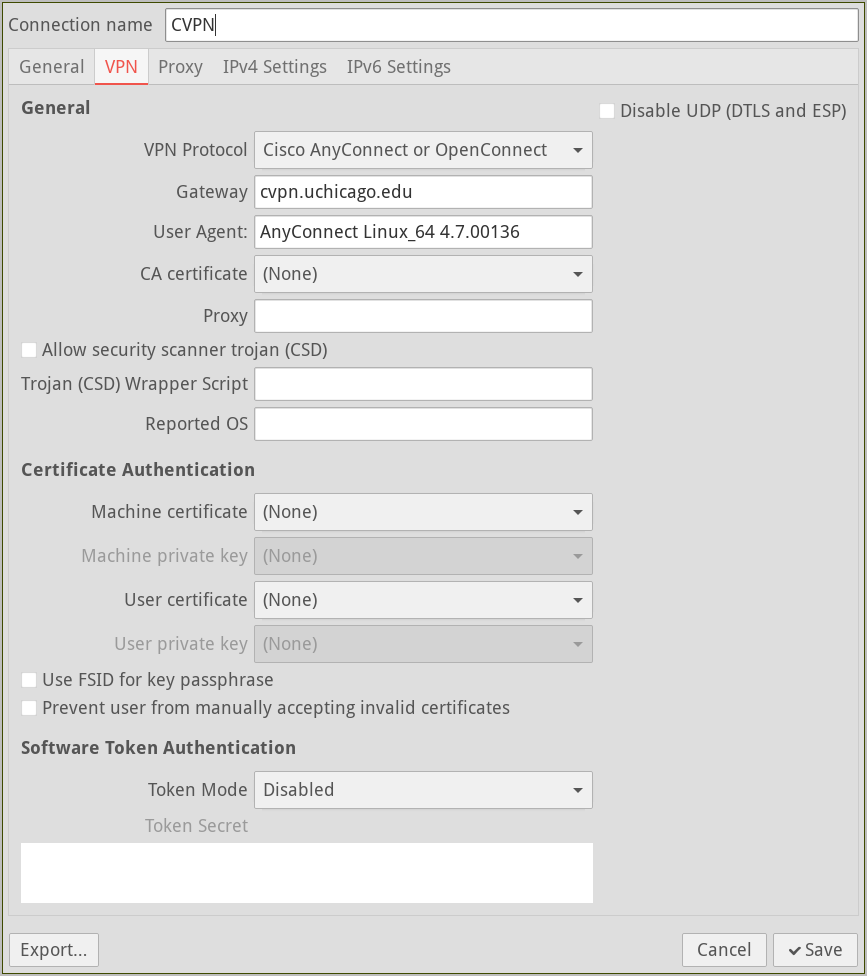
You can name the connection profile whatever you want. For this
example, I chose CVPN. Apart from that, only two fields of this GUI
widget that you need to fill in are:
- gateway:
cvpn.uchicago.edu - user agent:
AnyConnect Linux_64 4.7.00136
Then click “Save”. nm-connection-editor will write a file called
CVPN.nmconnection to /etc/NetworkManager/system-connections, which
is the same place where your other connection profiles are stored.
Make the VPN connection persistent
Although that is all you need for a basic VPN setup, there is one further configuration option that is a must-have for me personally, namely: persistence. This is a feature whereby, if you suspend your machine while a VPN connection is active, Network Manager will automatically reconnect to the VPN upon resume. Not only will it automatically reconnect–if your 2FA session has not expired, it will automatically re-authenticate for your in the background. If you resume your machine after your 2FA session has expired, it will clean the VPN connection up and fall back to your home wifi.
To enable this persistence feature, run the following command:
$ nmcli connection modify CVPN vpn.persistent true
That command will edit your CVPN.nmconnection file so as to turn on
the persistence option in the [vpn] section.
Alternatively: write your VPN connection profile manually
To create the profile manually, write the following data to the file
/etc/NetworkManager/system-connections/CVPN.nmconnection, chmodding
the file to 600 permissions and filling in a fresh UUID:
[connection]
id=CVPN
uuid=INSERT UUID HERE
type=vpn
autoconnect=false
timestamp=1750375513

[vpn]
authtype=password
autoconnect-flags=0
certsigs-flags=0
cookie-flags=2
disable_udp=no
enable_csd_trojan=no
gateway=cvpn.uchicago.edu
gateway-flags=2
gwcert-flags=2
lasthost-flags=0
pem_passphrase_fsid=no
prevent_invalid_cert=no
protocol=anyconnect
resolve-flags=2
stoken_source=disabled
useragent=AnyConnect Linux_64 4.7.00136
xmlconfig-flags=0
persistent=true
service-type=org.freedesktop.NetworkManager.openconnect

[vpn-secrets]
lasthost=cvpn.uchicago.edu

[ipv4]
method=auto

[ipv6]
addr-gen-mode=stable-privacy
method=auto

[proxy]
Don’t forget the 600 permission on this file. To generate a fresh
UUID, run uuidgen:
$ uuidgen
d36ad780-6a1d-40e5-976e-8a3df0c601f5
Network Manager will probably instantly detect this new profile, but if you want to be sure, you can restart:
$ sudo systemctl restart NetworkManager
Connect to the VPN
Once your VPN connection profile exists, you can use nmcli to
confirm that Network Manager recognizes it:
$ nmcli connection show
NAME                UUID                                  TYPE      DEVICE
CVPN                d36ad780-6a1d-40e5-976e-8a3df0c601f5  vpn       wlp0s20f3
HomeWifi            aacdb84a-d03b-4159-a47d-7f9d34b9b3b5  wifi      wlp0s20f3
lo                  1b3b25ac-7950-437d-8cdd-e6493f3f6d3b  loopback  lo
vpn0                edf18b13-3566-4b7a-87ee-6ccb70f637e1  tun       vpn0
Wired connection 1  57b64325-ea3a-3114-890c-625bafda9a7e  ethernet  --
We know that Network Manager recognizes the CVPN connection profile
because it occurs on this list. Before connecting to the VPN, you will
need to make sure that nm-applet is running in the background, so
that your system is ready to pop the 2FA browser widget up:
$ nm-applet &
To connect, run nmcli connection up on the name of your VPN
connection profile:
$ nmcli connection up CVPN
If you get an error here at the systemd level, suggesting that you
look through the system logs, it is most likely because one of the
required OS packages isn’t installed. See the above pacman command
for more info on how to look up networkmanager-openconnect’s
optional dependencies.
Assuming the configuration planets are in alignment, a GUI window similar to this should now pop up:
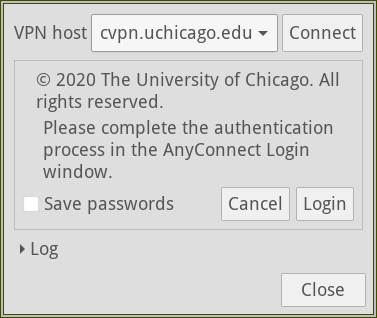
Hit “Login”, and then perform UChicago 2FA using Duo, the way you always do. More information on setting up two-factor authentication using Duo can be found here.
After clicking through a number of browser buttons, redirects, etc. you should eventually be connected to the UChicago VPN. You can confirm you’re on the VPN by finding out your IP address on the WAN:
$ curl https://ipinfo.io/ip
205.208.121.174
You can tell is a UChicago IP because it starts with a 205. For a
more thorough explanation of whether you’re in a UChicago IP range,
please see this
page.
Enough already: getting off the VPN
You’re on the VPN. Great. Now how do you get off? First, have Network Manager print a list of its known connection profiles:
$ nmcli connection show
NAME                UUID                                  TYPE      DEVICE
CVPN                450d650a-d56f-4dcb-b7a7-7093aa015c23  vpn       wlp0s20f3
HomeWifi            aacdb84a-d03b-4159-a47d-7f9d34b9b3b5  wifi      wlp0s20f3
lo                  1b3b25ac-7950-437d-8cdd-e6493f3f6d3b  loopback  lo
vpn0                24406dbd-b3ac-43e5-9be6-55711b35edeb  tun       vpn0
Wired connection 1  57b64325-ea3a-3114-890c-625bafda9a7e  ethernet  --
If you are currently connected to the VPN, HomeWifi, CVPN, lo,
and vpn0 should all be displaying in green in this listing. The
fact of being connected to the VPN in Network Manager manifests as two
additional connections: vpn0 and CVPN. vpn0 automatically fired
up after the 2FA process; it is not based on a configuration file in
the system-connections directory. I am not exactly sure why Network
Manager creates a new connection called vpn0 that is not based on a
configuration file, but the only thing you need to know to use it is
that you need to disconnect both CVPN and vpn0 when you
want to get off the VPN.
To disconnect from the VPN, run the nmcli connection down command on
both vpn0 and CVPN:
$ nmcli connection down vpn0 CVPN
Network Manager should now fall back to the previous home wifi
internet connection, HomeWifi.
Automatically launch nm-applet
Now, I suppose I could plan to always remember to open a terminal and
run nm-applet in the background after booting. But that kind of
sucks. Really, it should launch in the background in some sensible
way, whenever I restart my computer. There are a lot of possible
places one could make that happen, but since nm-applet is a GUI
application, I chose to launch it automatically when I start my X
session.
That means adding the following to my ~/.xinitrc file, prior to the
line that launches my window manager:
# nm-applet for authentication to UChicago VPN
nm-applet &
Now as soon as I boot up and start my X session, I’m ready to connect to the VPN if need be.
Always connect to the VPN
A second thing which I chose not to do, but which you may want to do,
is have your home wifi automatically connect to the VPN whenever you
connect to it. To accomplish that, you can add the CVPN connection
profile to your home wifi connection profile as a secondary
connection.
The command for adding the profile CVPN as a secondary connection to
HomeWifi is this:
$ nmcli connection modify HomeWifi connection.secondaries CVPN
That will edit your
/etc/NetworkManager/system-connections/HomeWifi.nmconnection file so
that it has CVPN.nmconnection listed as its secondary connection.
You can open the file to see the change, if you want; look for a
key-value pair in the [connection] section where the key is called
secondaries.
With that change, whenever you connect to HomeWifi, Network Manager
will then automatically connect to CVPN, saving you that additional
step. This is not something I anticipate needing, but I’m mentioning
it here since it seems to be something that people frequently want to
do on their machines.
That’s it
That is the extent of my own setup for connecting to the UChicago VPN, and I have to say it has been working quite well for me over the past half year or so. If you spot any errors in these instructions, or if you have any questions, please don’t hesitate to get in touch!
Matt Teichman